Create an online photo booth with Photobooth Creator

Make your party unforgettable

Make your party unforgettable with a photobooth

Have a photobooth at your next party for less than a bag of chips.

Learn more

Database Schema Management with git, Flask, SQLAlchemy, and Alembic

Posted on 15 December 2013 by Joseph

I'm a big fan of SQLAlchemy. Particularly when using Flask-SQLAlchemy, I find it gives me a lot of flexibility in creating data models. One spot it's lacking, though, is schema changes and database migrations.

After doing a bit of research, I came upon Alembic, a tool for managing database migrations as a collection of ordered Python scripts. (As a sidenote, the other main option is SQLAlchemy-Migrate). Alembic looked like it did all the things I needed:

  • It had a straightforward and easy-to-modify way of managing configuration options
  • It handled migrations in a human readable and human editable way
  • It could take a best guess at the migration needed based on changes to the ORM models

Perfect! With a hint from this handy guide, pulling configuration options (specifically, my database URL) from my Flask configuration files was easy.

A couple minor changes

Stamp your databases, my boy

Since I was starting from an already-released database, I had to take a couple more steps. First, I modified my database creation script. This script is only run in development, and it is used to wipe out the existing database and create a clean one. As Alembic uses a table to track the current database revision, this fresh database needs to be "stamped" with the latest Alembic revision. Luckily, this is simple:

from models import *
from alembic.config import Config
from alembic import command


if __name__ == "__main__":
    db.drop_all()
    db.create_all()
    alembic_cfg = Config("./alembic.ini")
    # This is the magic. Stamp the database with the latest db revision.
    command.stamp(alembic_cfg, "head")

Similarly, before you start committing any revisions, you'll want to stamp your production database. Assuming you have your configuration pulling correctly, you can do this from the command line:

alembic stamp head

Accept DB root password from command line

For security reasons, in my production environment the database user my application uses doesn't have the ALTER privilege. I prefer to instead do the migrations by hand. Previously, I have used available command line tools that allow me to specify the root password by on the command line without having to put it in a configuration file. When I started using Alembic in my production environment, I further modified the alembic/env.py file to similarly take a password from the command line. Between loading the Alembic config and using it, insert the following:

import getpass

url = app.config.get('SQLALCHEMY_ALEMBIC_URI',
                     app.config['SQLALCHEMY_DATABASE_URI'])
  # Parse the URL, look for root user
  parsed = urlparse.urlsplit(url)
  if parsed.username == "root":
      # Prompt for password (silently!)
      password = getpass.getpass("Password: ")
      fragments = list(parsed)
      b = fragments[1].split(":@")
      b.insert(1, password)
      fragments[1] = "%s:%s@%s" % tuple(b)
      # Re-create the URL
      url = urlparse.urlunsplit(fragments)
  
  # Set the (possibly modified) db url
  config.set_main_option('sqlalchemy.url', url)

Finally, you'll need to add the SQLALCHEMY_ALEMBIC_URI option to your production Flask config (which isn't in version control, right?). It should be set to the same as your SQLALCHEMY_DATABASE_URI except with the username/password set to "root:". Like so:

    SQLALCHEMY_DATABASE_URI = 'mysql://username:password@localhost/yourappdb'
    SQLALCHEMY_ALEMBIC_URI = 'mysql://root:@localhost/yourappdb'

With those changes, using Alembic in production will result in a prompt for your root password.

The workflow

Schema changes and migrations should not be done lightly and should be well tested before they are run against a production database. Here is an overview of the workflow I use for development that involves changes to the database schema:

  1. Create a new git branch for the feature.
  2. Within the branch, modify the models as required. Feel free to use drop_all(), create_all(), etc. as freely as you see fit. For me personally, my development config, prior to testing, uses SQLite, and I use a lot of rm test.db.
  3. When you feel the branch is ready to go, change back to master and create a clean database using the old schema. This clean database will be stamped with the latest revision.
  4. Merge the branch. I typically do a squashed merge so it's easy to back out if something is wrong, but it's up to you.
  5. Use the Alembic --autogenerate feature to get a tentative revision: alembic revision --autogenerate -m "Your commit message". This will create a new migration script but not run it yet.
  6. Take a look at the migration script, and modify it as needed. It's just Python, and you have the full compliment of SQLAlchemy tools, so go buckwild. If there is a problem, feel free to wipe out that script, modify models as needed, and re-run.
  7. When you're confident the migration looks right, run alembic upgrade head. This will apply the migration script. Take a look at the resulting schema on the actual database and make sure nothing looks wrong. If it does, go to step 5.
  8. When everything looks good, commit the new migrations script, along with the results of the feature branch.
  9. Finally, run the new migration script against your production database, again with alembic upgrade head. Because the database was previously stamped, any outstanding migration scripts will be run.

This workflow has taken a lot of the pain, and more importantly, a lot of the fear out of database migrations. Because the master branch always contains a known working state, it's easy to back out from any changes. Of course, if something DOES go horribly wrong, you have a little comfort knowing you can downgrade with Alembic. Thanks to heavy testing, it hasn't come to that yet, but I rest easier knowing that it's possible.

How to share your photos from Photobooth Creator

Posted on 12 December 2013 by Joseph

So you've set up a sweet photobooth using Photobooth Creator. Maybe you used the super-awesome "Basic" setup, or maybe you went a bit lazy and use the no-brainer "Super Basic" setup. Either way, you've got a bunch of photos you've taken, and now you're itchin' to share them with someone.

You have a couple options. If you're the Facebook type, you can simply go to your photos page (click the "See your pictures!" button on your booth page) and click the Facebook icon next to any of the pictures; the picture will be shared instantly on your Facebook page. Share the pictures you want, then ghost. Alternatively, from the same page, you can download the individual pictures to doctor, crop, and share as you see fit.

On the other hand, if you'd like to share your photos with only a select few, you can set your booth's photos page to public. Head to your booth administration page, and look for the box titled "Share your photos page!". By setting the page to 'public', you can share the URL for that page with other people who don't know your booth password. They can in turn download and share the pictures on their own Facebook pages.

If you're feeling REALLY adventurous, you can also set up automatic uploading for your booth. Look for the box titled "Send photos to Facebook!". Check the box "Do automatic upload" and (optionally) set an album name for the photos. Now, whenever you take a photo with your booth, it will be uploaded to Facebook automatically. Great for sharing the office Christmas party!

'The Basic': A simple photobooth setup

Posted on 24 November 2013 by Joseph

You've decided to have a photobooth at your next party, and you are excited to get things set up. Where do you start? What is the minimal effort you need to expend to build your own photobooth at home or at the office for you and your guests to enjoy? Perhaps you've seen a photobooth at a bar or another party, and it seemed complicated... solid structure, curtains, bright lights. How much of that is necessary to create ''your'' photobooth?

The answer is: almost none of it. At it's simplest, a photobooth is nothing more than a working camera, a controller for taking the shots, and what makes a photobooth different from just a camera lying around: ''isolation''. In this guide, we'll go over these minimal steps and equipment you need to get things up and running.

The equipment

In terms of physical equipment you don't need too much. Because setting up a photobooth today using a webcam and a computer is the easiest way, that's what I'll cover. If you want a ye-olde-timey photobooth with analog control, that's beyond the scope of this article (though maybe at a later date?). Here's what you need to collect:

  • A computer and monitor or laptop
  • A webcam if your laptop doesn't have one built in
  • A table or other way to elevate the webcam
  • An application to control the camera (might I suggest Photobooth Creator?)

Finally, though it isn't strictly 'equipment':

  • A out-of-the-way spot for everything that is ''at least'' out of the line of sight of the main party.

As mentioned earlier, the isolation provided by this last ingredient is what makes a photobooth more than just a camera. It provides your guests a way to remove themselves from the action of the party. This removal is what allows an encourages them to be silly, or racy, or whatever they want to be. By removing your guests from the main flow of the party, you guarantee that the shots you get from your booth will be exciting.

Practically speaking, you can use a bit of a hallway, or you can curtain off a spot, or you can use an empty (corner of) a room with a door. The important point is to ensure that the booth is out of the line of sight of the rest of the party.

The layout

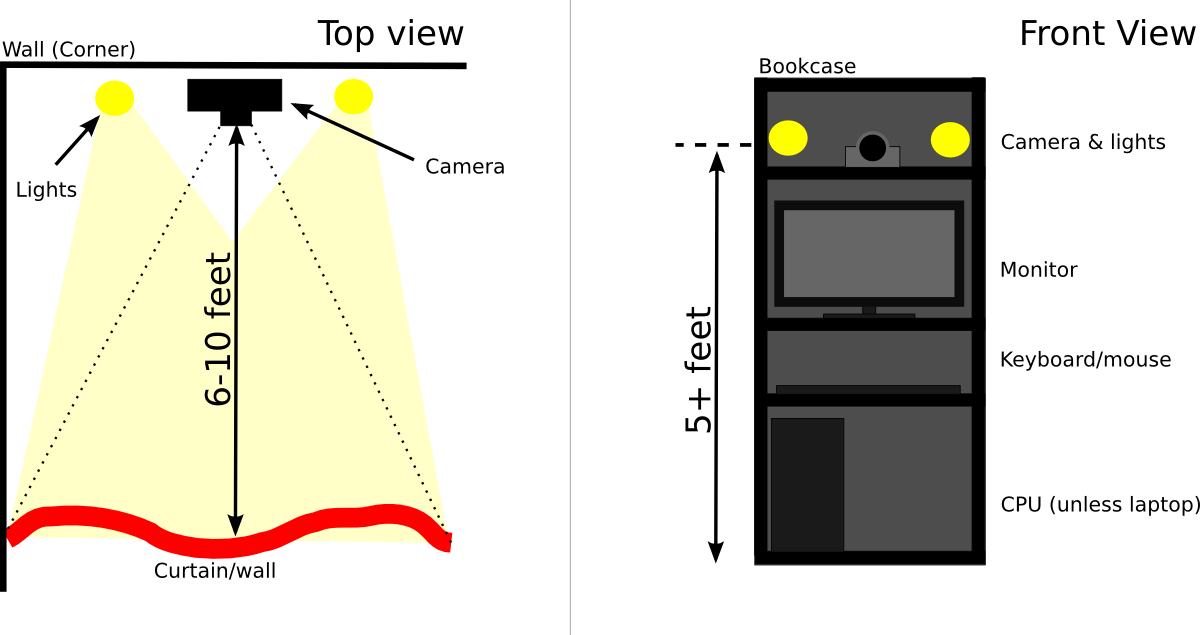
Here is the basic layout I recommend:

Basic webcam photobooth setup

There isn't anything too complicated going on here. You want the camera to be roughly face height (or a tiny bit higher... people look better at a downward angle). I prefer a standing booth because it makes it easier for groups of people to take shots together, but it doesn't have to be that way. Indeed, traditional photobooths were sit-down affairs, as the booths themselves were rather small. It's a matter of taste.

For a standing booth, a full-height bookcase works extremely well, but you can also use a table with something on top, or anything else of the appropriate height. Make sure that the screen you use is positioned near the camera, or you'll get a lot of pictures of people looking down at the screen instead of at the camera itself. You can also put a little sign on it to the effect of "HEY LOOK HERE NOT DOWN THERE!"

The bookcase also allows you to set up your trigger, whether keyboard, mouse, or something more complicated, on a lower shelf. If you're using something like Photobooth Creator where you can press any key to take a shot, you can also place a box or something over your keyboard with a "button" that presses one of the keys to simplify things.

Optional improvements

I like to put my booths in front of a background, ideally a solid-color background. While a background isn't strictly necessary, it will produce better photos, and it helps the camera get the color of things correct, particularly if you can find a white backdrop.

You also want there to be a bit of room between the camera and wall/curtain/whatever you use to create a background. Webcams tend to be very wide-angle, which means they capture a lot of their surroundings, but a little extra room gives people the space they need to go crazy. I'd say 6-10 feet of space from the webcam to the backdrop should do it, but take some test shots and see what works best.

I'll cover this more in a later post, but the best thing you can do to improve the photos coming from your webcam is getting the lighting right. Without going into too much detail, you want the light coming from behind the webcam, and you want to eliminate as much light coming from behind the subject. The backdrop will help with this.

The test

At this point, you're almost done. Go ahead and set up the controller software that you're using and get into the photobooth mode. Take a few test shots and back out to make sure that the shots are coming out well. Adjust your lighting and background as needed, then re-enter the booth mode.

You're done! All that's left is to tell everyone about it. The most effective way I've found is to take some group shots with other people... they'll be into it. The punchline to this whole article: it ain't hard, and you can set up a photobooth at your party without too much effort. Good luck, and let me know how it goes!

Welcome to the Photobooth Creator Blog!

Posted on 23 November 2013 by Joseph

Welcome to the newly minted blog for Photobooth Creator! Together, let's explore the world of the homemade photo booth. For me personally, having a photobooth at a party has been a great way to improve the quality of the party itself and to improve my memories of the party. In fact, it's one of the main reasons I built this site.

This blog is intended to be supplementary material for the Photobooth Creator app itself. Topics will include:

  • How to set up different styles of photobooth
  • How to improve the quality of the photobooths you create
  • How to get partygoers and guests to participate
  • Different setups and props you can use

And of course...

  • How to get the most out of Photobooth Creator, including new feature announcements

So stay tuned. My first ACTUAL post will be how to set up the most basic photobooth possible using the best tool possible for the job: Photobooth Creator.